Showing posts with label Photography questions. Show all posts

Thursday, January 21, 2010

Ten Top Tips for Monochrome Photography


\


Monochrome photography plays to a certain audience who desire a certain look for their interior designs. In a sense it is photography in its purest form relying on a pleasing variations of tones.

In the digital age any color photo can be desaturated of its colors to render a black and white Show allphoto.

1. Almost all photo editing programs have the ability to convert a photo to black and white. It is generally as easy as clicking a button to desaturate an image. But once you achieve this does the image reflect what you desire?

2. And in many programs you have choices. You could choose sepia, bluish tints, straight black and white etc. The style you choose is up to you. And although it may seem like an easy conversion there are many things to consider.

3. In the above photo a slight hint of sepia has been blended in the layers. To reach the point that I found pleasing. I used the black and white adjustment filter in Photoshop and added a slight yellowish tint. I used restraint in the amount of color mainly because a deeper sepia tone would obsure detail that I had carefully brought out in the image.

4. In monochrome photography without a color pallet you depend on tonal contrast to make emphasis, and impact. Striking monochrome photography relies on drama to capture the audience.

5. In the above photo the penetrating stare by both the mother and the baby influenced my decision to capitalize on the drama of the scene. But drama can take many forms and it could be just the relationship of light and darkness that makes a photograph a good candidate to be a monochrome image.


6. In this photo the tonal contrasts between the light and dark elements of the photograph was my deciding factor on processing this photograph as black and white. To emphasis the drama my choice was not to add any tinting to the photo. I decided on the sharpness of the black and white to be the major elements of interest in the photo.


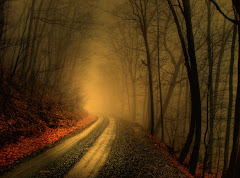
7. Sharpness is not always the deciding factor on choosing which photos to convert to monochrome. In this photo I chose to use the softness of the photo to draw on a sense of mystery. The blurring of the tonal contrast is what I think makes this photo pleasing. As well as effect of fog on the dappled light.


8. Sometimes less information can be more. This photograph in color would not have near the impact of a black and white image. The dramatic impulse of the deep black and whites was the deciding factors in converting this photo to black and white. The color version of this photo would have been completely unappealing.

9. My personal experience with black and white as opposed to color photography is that it appeals to a smaller audience. But, often the audience is more upscale in the prices that they will pay for good monochrome images. There is also a certain intrinsic reward in creating a beautiful image without the use of a large color palette.

10. I encourage you to experiment and not always think in terms of color. You may be passing up opportunities that you might just overlook if you do not look into black and white possibilities.

Friday, August 28, 2009

Top Ten easiest ways to understand F stop


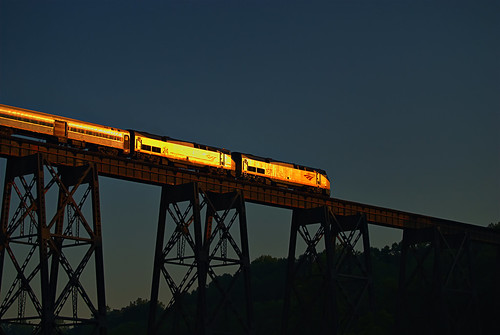
Photo Taken with a 55-200mm Nikon vr lens.


F Stop maybe the singular least understood term in photography. And when I have even talked to some accomplished photographers their eyes have glazed over at the mere mention of the term.

What makes F Stop hard to grasp to many is that the higher the F Stop the less light enters the lens.

Now, if that is not confusing enough the term F stop is loosely used as a measure in ISO and shutter speed.

1. The Video: To grasp all of this may seem daunting, but I hope by the time you reach the end of this post you will have a firm basic understanding. Lets start with this short video that will visually give you a quick jump start on the concept of F Stop.


2. A little more depth: Well, the video gives you a quick overview of what F Stop is. And you see how they are using F stops in the understanding of shutter speed and ISO.

To be more technically correct they should just be saying stops.

The official definition of F Stop is:

In optics, the f-number (sometimes called focal ratio, f-ratio, or relative aperture) of an optical system expresses the diameter of the entrance pupil in terms of the focal length of the lens; in simpler terms, the f-number is the focal length divided by the "effective" aperture diameter.

What this amounts to for the photographer is a number on the scale which tells how much light is allowed to come in through the lens.

This is controlled either by a ring on the lens or through camera settings. It really works like your eye. The iris will contract or get larger to expose the pupil to more light.

In a photographic lens these are like leaves that make the opening for light smaller or larger. Just remember the higher the F number the smaller the hole.

(Aperture also controls dof or depth of field which is entirely another concept which deserves a post of its own).

3. Lets check our understanding: We now know that F Stop is a number that shows how much light is let in the lens by an iris diaphragm getting larger or smaller. This is true F Stop.

Larger numbers mean a smaller opening, smaller numbers mean a larger opening. We also know that Stops are also used in relation with ISO and shutter speed.

Stops are in reality is just a short hand word so one photographer can tell another "I can get another stop out of this lens." Another photographer would understand this to mean this lens can use less light and still get a good shot.

4. All things work together: In most modern cameras the user will see on the camera dial at least these settings: A S .

For our purposes in this post, these are the only two settings we will discuss.

A means aperture setting
. When the photographer uses this setting he is controlling the iris diaphragm of the lens, the camera with its on board computer controls shutter speed and tries to adjust for the best picture.

Aperture settings I have found useful in fine tuning the contrast of an image and controlling DOF (Depth of Field).

The lower the F Stop the narrower the dof.

Depth of field is the amount of distance between the nearest and farthest objects that appear in acceptably sharp focus.

S means shutter setting: The length of time the shutter is open the more light is let into the camera.

The camera computer controls everything else to get the best picture. Using the S setting you can try to eek out the fastest speed to capture action, or the slowest speed for pictures in low light.

A lens with a small number for a F Stop can use less available light to get a good picture. It is considered a faster lens for this reason.

By faster it means that you can shoot at a higher shutter speed and still get a good picture. And the camera will acquire focus quicker.

This is because most auto focus systems use points of contrast to auto focus on. If you are using a lens on the edge of its ability with available light: Contrast is harder for focus system to detect.

5. A general rule: The longer the lens the more available light is needed. The best long lenses have "Big Glass" and can be stepped down to a low F Stop. This is the ideal, but it is very expensive. It also requires a tripod (or a monopod) to keep that heavy glass steady.

6. Exceptions to the general rule: With both lens technology improvements, camera improvements and noise reduction software improvements: There are some lenses that can get great images even though they do not have that low F Stop number.

They offer a lower cost opportunity to get good images from lenses. And can be hand held with great results.

Digital cameras are also improving in handling higher ISOs. The ability of a camera to take good images at higher ISO's is arguable more important than mega pixels in camera selection.

I highly recommend the Nikon 55-200mm vr lens that I get consistently great shots and it is one of the least expensive Nikon lenses. It is quick, works great in fairly low light conditions and it produces high quality images. The image at the start of this post was taken with this lens.


And, I have been impressed with the shots photographers are getting with the Sigma 150-500 HSM lens. Even at 500mm this lens produces shots with exceptional detail.


These two lenses are great examples of how technology met the challenge of producing superb lenses at a reasonable cost.

7. F Stop as a measurement in ISO and Shutter Speed: We saw in the video how F Stop can be communicated in terms of ISO.

This is more or less is a measurement factor and should be explained as gaining or losing a stop rather than a F Stop to be more technically correct. First lets understand what ISO is:

ISO equivalence on a digital camera is the ability to increase the sensitivity of the sensor to enable faster shutter speeds and/or better performance in low light.

One Stop according to the video would be increasing the ISO from 100 to 200.

So you would gain one stop in this scenario. Since 200 ISO requires more sensor sensitivity you would be stopping down.

Likewise if you increase the time the shutter is open you would also be stopping down.

8. Other Factors: So by now you are getting things a little firmer in understanding the term stop in photography.

One stop is a measurement tool of a change in settings, and one stop equals twice as much light as the previous stop.


Another tool a photographer uses are neutral density filters that block the amount of light coming in the camera.

To get that silky texture of waterfalls many photographers prefer a slower shutter speed and the filter allows the photographer to accomplish this without blowing out the picture highlights. Other uses are controlling depth of field.

9. Buying lenses: Perhaps one of the best uses of the knowledge of F Stop is evaluating the lenses you buy. If a camera has an F Stop number in the low range. You know it will be a great performer.

10. Watch the Video again: Just to reinforce what you learned here, I highly recommend you watch the video again. I think you will understand with a greater depth of this somewhat hard concept to grasp.

Wednesday, June 24, 2009

Top Ten Tips to evaluate your photos


Two wolves at Yellowstone

Photo caption: “When twilight drops her curtain down and pins it with a star, remember that you have a friend though she may wander far.”
unknown

How to self critique your photograph, may be one of the most important evaluations that you can do. This can be especially important if you are photographing for others. You need to refine your eye to do a critical analysis of your photograph.

1. Begin before processing: Remember to take many pictures. And if possible from different angles and heights. Check the framing, composition and lighting. Process the picture that has the necessary material in the raw form to make an exceptional photograph.

2. Process your photograph: Use your best skills in processing a photograph. Photographer's have style. What is yours? Is it based in the tonality of the picture, light, contrast and composition? Is the photograph telling telling your audience to say wow? Just from the implementation of your style.

The way to develop style is to look at the photographs of those that are considered best. Look for their style, but do not be a mimic.

Could you recreate the styles you like? And more importantly can you use what you learn from others as an embarking point to develop your own unique work.

3. Does your photograph have depth: Photographs are two dimensions portraying three dimensions. If your photograph looks flat you automatically lose your audience.

Refine your understanding of composition by thinking in spacial terms. Good photography leads the eye through the photograph. The deeper a person can look into a photograph is directly related to the appeal of the photograph to the viewer.

Simple principles of geometry can add greatly to the feeling of depth.

4. Does your photograph tell a story: Not all good photographs tell a story. Nevertheless, if your photograph does it will help peak the interest level in your photograph.

The story need not be elaborate, but does the photograph tell you something or make you think.

5. Does you photograph have meaning: Photography is much like writing in this sense. You have to define your audience. Who is your audience?

Are you playing to a larger universal audience or more of a personal audience? Does your photograph have meaning to your audience?

6. Does your photograph capture the senses: By default photography is a visual medium. But good photography can and does engage other senses.

How does the photograph make you feel? What other senses are engaged: taste, hearing, touch. Does your photograph speak to other senses?

7. Is your photograph half baked: Did you take your photograph out of the processing oven too soon?

Enlarge your photograph and look at the small details. Are these the best they can be? If not correct your photograph. I usually magnify my photo to about 800 percent and pour over the details looking for flaws.

8. Can you be unbiased in your appraisal: Everyone is subjective including me. Realize you are not looking through the perfect prism when you evaluate your photographs.

Put your photographs up in social sharing sites like Flickr. On these sites people are generally complementary about your photographs, so a measure of best photos could be the number of views and invites you may get.

Sometimes harsh criticism is hard to find. Any you do get should be valued and looked into carefully.

9. Review your photographs again at a later date: Take a fresh look at some of your older photographs. How can they be improved?

Consider reprocessing or even deleting to have the best photographs represent your work.

10. Continually review the work of others: Study the work of others often. Surf the net and see what surfaces to the top.

See what others think are great and try to understand how it was done. Photography is a school that you never graduate it is a continual learning process.

Thursday, June 18, 2009

Top Ten Essentials for Event Photography


For the last two years, I have been doing dirt race track photography. And it has been a successful sideline. If you would like to get into event photography there are some essential steps that I have learned from experience.

1. Do your research: Pick an event that you know you will enjoy. The ideal event will be re-occurring on a weekly basis. You will want to be a fixture at the event coming each week.

Make sure you are welcome, talk to the owners/mangers and tell them you would like to help support their event. Show them samples of your work so they know what you can do. And by all means have your own style to separate yourself from other photographers.

2. Have the right equipment: I use a Nikon D80 and several vr lenses.

Beyond the camera equipment you may need a Step Stool, a folding table, and a way to display and carry your photos. And a notebook and a pen to keep track of orders.

Drinks, food and a good hat I have found all necessary for long intensive shoots. You may be standing in the sun all day and these essentials are a necessity. And have some camera rain protectorsand plastic bags just in case you need to cover things up.

3. Develop a methodology: If you have to carry everything figure out the best way to make things easier for you. For instance I use reusable shopping bags to combine all the small items, a back pack for my camera gear, and bungee cords to tie together my step stool and aluminum table.

Realize your day is going to cover two functions shooting pictures and selling. Figure a good times for both these activities. A lot of my selling happens a couple of hours before the event begins.

Scope out the best place for sales. Near restrooms and near concession stands are two prime locations for sales. If at all possible have an assistant to help you. I have found that indispensable. Event photography is hard work I take at least a 15 gig card an event. And many times more.

4. Maximize your sales: Most of my sales happen at the event itself. I shoot one week and have the pictures available the following week.

As you get to know the participants and fans you will get requests for pictures. I always print spec photos (8x10s) and keep them in notebooks and keep them displayed through the event.

I use plastic sheet protectorsand when I make a sale include the protector in the sale. You want to keep your prices reasonable and you will get repeat sales week to week.

5. Miminize costs: I do most of printing locally. It took me awhile to find a printer that was reasonable and good. I use the profits from the previous week to print the following week.

6. Have an online gallery: This can help you have added sales directly online. Mostly the participants tell me I saw that picture online and I want it. This has really been a boon for business. I also have two sites that promote the event itself.

On one, I feature many of the photo products that I can do with their favorite photos. Not only do the event managers like this, but it has increased my sales of other photo products. Take a look at my video blog and take a careful view of the left sidebar.

You will quickly see how I capitalize on sales. I also have a YouTube site that links directly back to my gallery.

7. Treat the event staff well: There is nothing like building good will. I often give freebies to the event staff and the owners. After all, if it was not for them the event would not be happening at all. Do all you can to be a positive asset to the event itself.

8. Build relationships: The more relationships you build the more successful you will be overall. Perhaps one way of thinking about this is like building incoming links to a web page. The more incoming links the more opportunities you will have. And perhaps even beyond the event for other photo shooting opportunities.

9. Schedule time for photo processing: I usually spend a full 8 hours or longer processing photos before the next event. Photo processing is something I do not rush through. Plan ahead and get your work done.

10. Consider what you can do better: Would a Portable Printerimprove your sales? Do you treat everyone with the respect they deserve? Keep asking yourself how you can refine your craft.

Related Posts:

Ten ways to sell your art and photography

Ten Top ways photographs sell

Thursday, June 4, 2009

Ten Top Reasons Photographs Say WOW


Beyond all the rules of photographic is the intangible WOW. WOW happens at lightening speed in the viewer's mind. They know WOW and perhaps they can not explain why they were WOWed.

So how can the photographer achieve WOW in the viewer's mind? To reach this intangible are some tangible hints.

1. The medium is the message: Marshall McLuhan theorizes on the effect of media on the mind. In the Wikipedia explanation is a good start in understanding the relationship of the viewer's mind in response to media. And of course photography is a medium.

2. Tonal quality: Tonal quality can add sensual undertones. These can be over stated or under stated. And, I suppose this relates to style. Even in Black and White photography the tones of transition can have a deep effect on the viewer mind. In color photography, I try to achieve a pleasing smoothness to acquire that eye candy feel. Other photographers delve into harsher tone transitions. The real point is to offer something unique that is not found in snap photography. Tonal quality is an evolving process for me, and it has been part of the evolution of my style.

3. Style: Style is the fingerprint that an artistic photographer places on his photograph. Style can be achieved from the compositional elements, the post processing techniques and even the camera settings, or the kind of camera a photographer uses.

All of these elements really have a bearing on style. And each good photographer develops his unique approach. Many photographers try to emulate work.

Imitation may be the best flattery, but learning from others then evoking your own style should be your goal. Style is a process that grows with the photographer. As I look through my photographs, I definitely see a progression. I have posted most of my work on Flickr and a time line of development can be noticed.

4. Atmosphere: What photographs are likely to send a viewer into orbit?

I have found that atmosphere can be a deciding quality. A foggy scenes taken in the woods, a mountain landscape or a river scene adds immensely to the visual appeal of the viewer. I look for these atmospheric events to add accent to my photographs. I know when nature interacts it positively affects the WOW.

5. Interaction: When people or animals interact in your photographs you tell a story.

You have one frame to tell a story. Your subject can interact with others or even the viewer. A one frame story does not have to be the whole story. If it leaves something unsaid the better. Letting the viewers interact with their own musings is the ultimate in making a photograph interactive.

6. A sense of mystery: We always enjoy the imponderables. If our photographs can inspire a viewer to reflect we will hook the viewer.

I really can just can't tell you how to do a photograph with a sense of mystery. I can give you a hint. It is all in how the photograph leads the eye. If you can lead the eye into a deeper more provoking space you may achieve the sense of mystery.

7. A sense of disbelief: In good novels an author who can suspend the sense of disbelief can consume the reader.

The same is true for the artistic photographer. No photograph is an exact representation of reality, even snap shots. Reality is changed from three dimensions to two. Colors light and contrast are different from what reality presents. How effectively a photographer makes this transition depends on his ability to suspend the viewer's sense of disbelief.

8. Thematic Photography: Thematic photography helps a photographer develop his specialty and evoke style.

Thematic photography can broadly span the photography a person does. Nature, politics, sports, journalism and even wedding photography can promote certain styles.

Personally, I present two themes in my photography. I find it interesting that each have evolved separately. My style in nature photography is different than my race car photography. Themes help build a photographer's evolution in creating style and his own personal WOW factor.

9. Conceptual Photography: The idea here is to covey a concept.

As a nature photographer I am constantly emphasizing the importance of nature. Photographs are subliminal messages.

Other photographers have other messages in the photographs. I do not always agree with their message, but I appreciate the style and delivery. Every time you can inspire a viewer to think you are tapping into the WOW factor.

10. Originality: Perhaps you have gleamed from my last nine points an emphasis on originality.

If your photographs fall into a general commonality with others you are not exploiting the WOW factor.

Photoshop tutorials tend to lend to that commonality. And while I do suggest you explore these, you might try striking out on your own plowing new ground of creativeness. After all, only if you are different will you truly tap into the WOW factor of your viewers.

Friday, April 10, 2009

Top Ten Steps: Making a YouTube Slideshow


As a photographer who wants to gain exposure, you might have overlooked the idea of placing videos on YouTube. Here are ten easy steps to make a video slide show on YouTube. Above is my best example of what works best in a slide show.

1. Download Picasa. Picasa is not only an excellent way to organize your photos, it makes making slide shows a breeze.

2. Create an album. This is easy to do, and it does not move your files from their folders. To start just select file at the top of the page then click new album and name your album.

3. Select your pictures. This is very easy. Just right click the photos and the pop up menu will have add to album. Click on the album name and instantly the photo is added to your album.

4. Know how many pictures equals the running time of your video. You can use this as a rough guide. 147 pictures will give you a running time just under ten minutes. To keep your visitors interested I would recommend a running time of no longer than five and half minutes. Just remember YouTube only allows a maximum ten minute run time. For a five minute run time I would suggest around 80 pictures.

5. Arrange your pictures. Remember that pictures can tell a story. Order your pictures in an arrangement that makes interesting transitions.

6. Let Picasa do its magic. Once your pictures are arranged just press the create a slide show. I usually stick with the standard options for this, except I find the pan and zoom transition more entertaining. Now you just have to wait for the movie to be made.

7. Get a YouTube account and upload your video. While uploading, I add in the title and description and tags etc. I set to private, until I am ready to go live. And that happens after I complete the next steps.

8. Add music. Once your video is uploaded and processed on YouTube, you can now add music. Just click the audio swap button and check the box, "Only show songs of similar length to my video." Then preview the songs that are suitable for your slide show video.

9. Go back to edit and make your video public. I wait until the audio is live.

10. Share the fun. I have set up a blog to feature my race track videos, you can also share through the variety of social network sites. And be sure to tell your friends. This is a fun way to promote your photography.

Monday, March 30, 2009

Top Ten Great Links For Photographers

Spring celebration

1. Photocritic: This site by Haje, is one of the most informative sites for photographers on the Net. I have purposefully linked to an article about contrast. Contrast to me is one of the most important elements in presenting a photograph. Here Haje tells you how to adjust the contrast to really give your photo some bang. I would not stop here with reading. He covers a variety of photographic subjects and I am an avid reader.

2. Srobist: There is one over riding rule about photograph and it is all about light. I try to work with the light around me from the sun, ambient light and finding the best perspective found in natural light. The strobist takes you into the world of strobe lighting. With many how to's and examples of results all photographers can learn from the Strobist's fine tutorials.

3. Photopreneur: This all around site tackles many quandaries for photographers. Most of the articles are about monetizing your photographs. I always appreciate the advice I find on this excellent site. The helpful hints I find here are priceless.

4. Digital Shot: This blog has a variety of contributors that offer all kinds of information on photography and processing. You will find lots of information about free photo editing programs for those who constantly try to reach the creative edge.

5. fotohacker: A variety of photographic advice and yes hacks. Learn what others do to help make the picture taking easier, more professional and creative. Good read for camera geeks.

6. Photoshop User TV: I like this video presentation, because it gives you time to absorb the content on some very excellent tutorials. This show does have a lot of promotional content that mostly I am not interested in, but the tutorials are top of the line.

7. Make TV: Now, most of this site is just a distraction, but interesting so. It is like visiting the 12 dimension of all things visual. If you want to know the cutting edge, walk on this thin line of perception of things to come. Or are they really here? Am I behind the curve? In the mists of all this are some ideas you can really use.

8. Earth Bound Light: I picked earth bound light for its tips of the week. Be sure to hit the previous buttons so you can find the content that interests you. I like this because I am sometimes more illiterate about camera technical knowledge than I should be. Here are easy to read articles that will help you understand some of the technical aspects of the camera, lens and filters that you use.

9. TZPlanet: This eZine has interesting content. It is more of a variety magazine and offers some relaxing reads and links to beautiful pictures by excellent photographers.

10. Beyond the Obvious: Paul presents his thoughts on life and photography. What I like about this blog is he brings home the idea of being personable about his photography. I really like his stories behind the photograph that gives insight to the viewer about the shot. A lesson can be learned for all of us photographers. It is important to connect not only visually but with words.

Monday, March 16, 2009

Top Ten Dumb Photography Questions.

This is the thing

I really enjoyed an article on Wild Shots, and it inspired me to write this.
Really, I am much politer than this when I answer questions. But sometimes I have considered answering like this.

1. Did you use Photoshop? No, that is the raw image out of the camera.

2. Your camera takes great photos what kind of camera do you use? If I put the camera on the ground what kind of pictures would it take.

3. Did you take that picture? No, I copyright everyone’s pictures. Actually, KoKo the monkey took this one.

4. I would like to sell your picture as wall paper can you send me a high resolution image? Sure, as soon as I take some pictures of flying pigs.

5. What camera settings are using? I don’t know I just twist the dials.

6. What is the best picture you have ever taken? The next one.

7. Will you teach me how to use the camera, I have an hour next week? Sure, I can condense everything I learned in 40 years in an one hour lesson.

8. Where do you take such spectacular pictures? Could you move over a second you just blotted out my picture with your face.

9. What type of film do you use? Well, this camera is digital, so I buy it from Polaroid.

10. Do you mind If I borrow your camera, I am going to my school reunion party? Sure, but I require a rental fee of 10,000 dollars.