Friday, August 28, 2009

Top Ten easiest ways to understand F stop


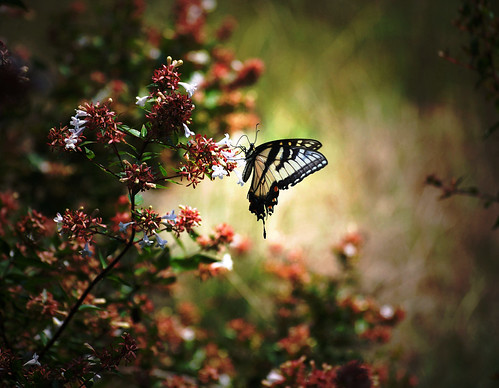
Photo Taken with a 55-200mm Nikon vr lens.


F Stop maybe the singular least understood term in photography. And when I have even talked to some accomplished photographers their eyes have glazed over at the mere mention of the term.

What makes F Stop hard to grasp to many is that the higher the F Stop the less light enters the lens.

Now, if that is not confusing enough the term F stop is loosely used as a measure in ISO and shutter speed.

1. The Video: To grasp all of this may seem daunting, but I hope by the time you reach the end of this post you will have a firm basic understanding. Lets start with this short video that will visually give you a quick jump start on the concept of F Stop.


2. A little more depth: Well, the video gives you a quick overview of what F Stop is. And you see how they are using F stops in the understanding of shutter speed and ISO.

To be more technically correct they should just be saying stops.

The official definition of F Stop is:

In optics, the f-number (sometimes called focal ratio, f-ratio, or relative aperture) of an optical system expresses the diameter of the entrance pupil in terms of the focal length of the lens; in simpler terms, the f-number is the focal length divided by the "effective" aperture diameter.

What this amounts to for the photographer is a number on the scale which tells how much light is allowed to come in through the lens.

This is controlled either by a ring on the lens or through camera settings. It really works like your eye. The iris will contract or get larger to expose the pupil to more light.

In a photographic lens these are like leaves that make the opening for light smaller or larger. Just remember the higher the F number the smaller the hole.

(Aperture also controls dof or depth of field which is entirely another concept which deserves a post of its own).

3. Lets check our understanding: We now know that F Stop is a number that shows how much light is let in the lens by an iris diaphragm getting larger or smaller. This is true F Stop.

Larger numbers mean a smaller opening, smaller numbers mean a larger opening. We also know that Stops are also used in relation with ISO and shutter speed.

Stops are in reality is just a short hand word so one photographer can tell another "I can get another stop out of this lens." Another photographer would understand this to mean this lens can use less light and still get a good shot.

4. All things work together: In most modern cameras the user will see on the camera dial at least these settings: A S .

For our purposes in this post, these are the only two settings we will discuss.

A means aperture setting
. When the photographer uses this setting he is controlling the iris diaphragm of the lens, the camera with its on board computer controls shutter speed and tries to adjust for the best picture.

Aperture settings I have found useful in fine tuning the contrast of an image and controlling DOF (Depth of Field).

The lower the F Stop the narrower the dof.

Depth of field is the amount of distance between the nearest and farthest objects that appear in acceptably sharp focus.

S means shutter setting: The length of time the shutter is open the more light is let into the camera.

The camera computer controls everything else to get the best picture. Using the S setting you can try to eek out the fastest speed to capture action, or the slowest speed for pictures in low light.

A lens with a small number for a F Stop can use less available light to get a good picture. It is considered a faster lens for this reason.

By faster it means that you can shoot at a higher shutter speed and still get a good picture. And the camera will acquire focus quicker.

This is because most auto focus systems use points of contrast to auto focus on. If you are using a lens on the edge of its ability with available light: Contrast is harder for focus system to detect.

5. A general rule: The longer the lens the more available light is needed. The best long lenses have "Big Glass" and can be stepped down to a low F Stop. This is the ideal, but it is very expensive. It also requires a tripod (or a monopod) to keep that heavy glass steady.

6. Exceptions to the general rule: With both lens technology improvements, camera improvements and noise reduction software improvements: There are some lenses that can get great images even though they do not have that low F Stop number.

They offer a lower cost opportunity to get good images from lenses. And can be hand held with great results.

Digital cameras are also improving in handling higher ISOs. The ability of a camera to take good images at higher ISO's is arguable more important than mega pixels in camera selection.

I highly recommend the Nikon 55-200mm vr lens that I get consistently great shots and it is one of the least expensive Nikon lenses. It is quick, works great in fairly low light conditions and it produces high quality images. The image at the start of this post was taken with this lens.


And, I have been impressed with the shots photographers are getting with the Sigma 150-500 HSM lens. Even at 500mm this lens produces shots with exceptional detail.


These two lenses are great examples of how technology met the challenge of producing superb lenses at a reasonable cost.

7. F Stop as a measurement in ISO and Shutter Speed: We saw in the video how F Stop can be communicated in terms of ISO.

This is more or less is a measurement factor and should be explained as gaining or losing a stop rather than a F Stop to be more technically correct. First lets understand what ISO is:

ISO equivalence on a digital camera is the ability to increase the sensitivity of the sensor to enable faster shutter speeds and/or better performance in low light.

One Stop according to the video would be increasing the ISO from 100 to 200.

So you would gain one stop in this scenario. Since 200 ISO requires more sensor sensitivity you would be stopping down.

Likewise if you increase the time the shutter is open you would also be stopping down.

8. Other Factors: So by now you are getting things a little firmer in understanding the term stop in photography.

One stop is a measurement tool of a change in settings, and one stop equals twice as much light as the previous stop.


Another tool a photographer uses are neutral density filters that block the amount of light coming in the camera.

To get that silky texture of waterfalls many photographers prefer a slower shutter speed and the filter allows the photographer to accomplish this without blowing out the picture highlights. Other uses are controlling depth of field.

9. Buying lenses: Perhaps one of the best uses of the knowledge of F Stop is evaluating the lenses you buy. If a camera has an F Stop number in the low range. You know it will be a great performer.

10. Watch the Video again: Just to reinforce what you learned here, I highly recommend you watch the video again. I think you will understand with a greater depth of this somewhat hard concept to grasp.

Tuesday, August 25, 2009

Ten Top Ethics for a Nature Photographer


Many disciplines have their ethical guidelines, including fields of photography like photojournalism. I am not sure if others have their ethical guidelines for nature photography, but I thought I would share mine.

1. Share beauty: What you capture in lens can be so beautiful, entrancing and wonderful. Help guide others to the appreciation of beauty you see as a communion of spirit. Let others know of your deep respect and love for nature. So that love can help them find their love.

2. Respect the land: With every action you do when you step into the world, try to leave the least imprint of your presence. If you see where someone has left garbage or something that has marred the environment, do what you can to set things right even in small ways.

3. Do by example: If you go on an outing with someone else show by your behavior your respect for nature. Sometimes small little acts are worth more than a thousand words of advice.

4. Treat animals with love and respect: Animals deserve our respect and love. Never mistreat, abuse animals in nature. Follow the guidelines in not feeding wild animals. And share with others the reason why. Respect the space of animals and do not intrude or interrupt their life.

5. Become in sync with nature: Go quietly into nature. So often I see people in conflict with the sounds of nature that they never have the opportunity to see the beauty that unfolds around them. Noise and even loud voices interrupt the rhythm of the natural world and as you pass through nature it will hide from you til you are gone.

6. Take the time to observe: Quiet and stillness are some of your best friends in the natural world. Take the time to be still and just look to see and feel. And the world will open to you.

7. Teach the children: Show your children appreciation of nature, teach them what you know. And show by example your love and respect for the physical world.

8. Remind yourself of your ethics: Even with this exercise of writing this post. I am remembering and reinforcing what I know is important. Sometimes I stray, but thinking about these things again helps me to better interact with nature.

9. Learn from the example of others: There are many who excel in their dealings with the natural world more than you or me. And you can learn lessons just by watching. You can learn from anyone they may be smarter than you or less so. But they all have lessons to teach.

10. Man's world is different than the natural world: Sometimes it is easy to lose sight that man makes a world different than the natural world. Man has estranged himself from nature in many of his thoughts ideas and concepts. He lives almost in an artificial world of politics and his technological environment . I think it is important to understand our artificial world for what it is and the natural world for what it is. When I move in the natural world I try to leave man's world behind.

Ethics to me are not hard and fast. They are a guide and a reminder of how we humans and nature should interact. And if you can bring your camera to illustrate the beauty and spirit of nature you are performing a service to yourself and perhaps others.

Sunday, August 9, 2009

Top Ten Ways to Improve Your Photography


Photo Mystery of Grace.
Caption: “I do not at all understand the mystery of grace - only that it meets us where we are but does not leave us where it found us.”
Anne Lamott


Are you on the top of your form and you have reached the top photographic perfection? My hat is off to you. For someone like me it is like being in the old west. There is always a faster draw and I am still learning how to slick out that gun faster.

Photography has been a continuing challenge. And it is a constant learning curve that I climb.

And I am certain that hill will always be before me. On this hill there are photographers both behind and ahead of me. But the important thing is that I continue the journey.

So having been on this sojourn for awhile I thought I might share some thoughts to my fellow travelers.

1. Its not the camera: Many of my published shots and those that have won contests have been done with a point and shoot camera. Right now I have a picture that has been accepted to a National Juried Show that was taken with a digital elph.

While like most photographer junkies, I am constantly up grading my equipment. But like a jarring stick I am constantly brought back to the reality that any and every camera can be an effective tool. The best advice I have ever heard for a camera purchase is does the camera feel right in your hands.

2. Its not the photo editing program: I have used a variety of photo editing programs and have gotten great results with all of them. I must say Adobe Photoshop is my favorite. But I have pictures that have over six million views and have won contests that have been edited in cheap programs like Microsoft Digital Image Suite and have never been touched in Photoshop.

3. Its not even the photographer: I do think if you handed a camera to a monkey and he took enough pictures that somewhere in that pile would be some great photographs. I think you could even take great photographs with your eyes shut. Revisit this post to see the evidence.

I am constantly surprised when I see cameras sold on eBay that only have a couple of thousand or less shutter actuations. I take that and more in one days shooting. If I advertised my camera for re sale on eBay it would go something like this:

A used to death Nikon D80, all the paint worn off all the buttons. Camera has been used in the rain, snow, sleet, and has been submerged under water. Like a Timex this camera has taken a beating and keeps on ticking off great pictures. Shutter life expectancy 80,000 actuations. This camera has a quarter of a million. I think it is just getting broken in. By the way, this camera is not for sale, I love it.

The point is take lots of pictures and you will end up with some great shots.

4. It is not Photoshop by the numbers: If you follow Photoshop tutorials remember that you are doing the same thing everyone else is doing. The best way to use those tutorials is to look for small things that you can add to your own style. If you follow the full tutorial realize you are using a cookie cutter approach and you photographs will be a generic feel similar to everyone who follows the tutorial.

This reminds me about paint by the numbers that was popular in the late fifties and early sixties. One clown picture really sticks in my mind that was done by millions. Oddly, this has evolved into collector art, and even a paint by number picture was hung in the White House by none other than Edgar J. Hoover.

5. It is composition: Photo composition is the primary reason photographs draw an audience. While you can have all the technique and style in the processing end, if you don't have a good or even great composition your photo might as well be decorating a dung heap. There are many ways to frame your photographs. And people have written extensively about all the techniques. You should read them, know them, and make them a part of your DNA.

Remember a photograph is only a flat piece of paper. Using composition tricks the viewer in finding depth reaching for that three dimension feel. And, if you enter the fourth dimension that portends symbols and markers for the audience to relate. You will capture the imagination of the viewer.

So how do you know your composition is working? Well, if you have made the knowledge of composition part of your DNA. You will get an actual feeling of wow before you push the shutter. Yep, you feel when you are in the zone. It is a thoughtless process and that is what works for me.

6. It is paying attention to detail:
This was and is one of my hardest and continuing lessons. My processing time for a photo is at minimum now about four hours. I try to pay close attention to each nuance of the photo. I will intently go over the photo by enlarging it to view almost each pixel. Even then, I can find flaws after the photo is processed.

I just do not tell anyone were the flaws are, but they really stand out to me. And, I do go back often to correct them.

Attention to detail in photography is paramount. Henri Cartier-Bresson touched up his photos with a one hair brush. This is what separates the wheat from shaft in photography. This tool, I have found indispensable in photo processing. If you do not have it, it should be your next purchase to improve your photos.

7. It is knowing light. Photography in the basic sense is how objects interact with light. This is what you are recording and it is the most basic element of photography. As composition should be part of your DNA, your knowledge of light should be second nature to you also. Study light and your photography will improve by quantum leaps.

8. It is knowing your black and white point: By black point I mean the very darkest part of your photograph and white is the lightest. Between those points are the gradients of change. Each point in that transition defines your photograph. Everything from tonal contrast, effective colors, to sharpness and blur are reliant on effective black and white points.

9. It is passion: It is having that driving force that compels you to take the best photograph you can. And it is the gumption to process your photograph at the highest level of your skill. It takes a certain amount of compulsive behavior to continue to aspire and push yourself harder. And you have to enjoy the push, if not find something else you are passionate about.

10. It is confidence: At some point you have to decide that you are a good photographer. And even better a great photographer. There is lots of competition and there are many great photographers. You have to elevate your self esteem, and promote yourself in that class. If you do not consider yourself a great photographer no one else will either. I generally let my pictures do my talking by carrying a portfolio.